My Book Scanner
See Android Book Scanner for the successor to this never completed project.
- Introduction
- Cameras
- Camera Trigger
- Base
- Platform
- Platen
- Interlude With Cameras
- More Platen
- Lights
- Platen For Sure This Time
- Camera Mounts
- Wiring
- Accounting
- Future Plans
- References
Introduction
A Saturday afternoon in January was aproaching the time of twilight, and that vast tract of unenclosed wild known as the Internet would soon suck me into the geekest project yet in my collection of geeky projects. (See for instance the Mark II Cell Phone Ring Detector.)
This was the last weekend in January of 2011 and I stumbled across the DIY Book Scanning web site. It was like finding the Holy Grail! A lifetime of buying books has left me with books everywhere. If I could start scanning them, I could pack them away (I couldn't think of actually parting with any of them, mind you).
Eagerly perusing the forums, I soon started making plans for my own scanner and discovering just how disorganized the forums are :-). I'll try to put things in a reasonable sequence in this web page.
Cameras
The first thing I'd need would be a pair of cameras. The software lots of folks in the forum are using to run their cameras is SDM - SteroData Maker, a tailored variant of CHDK. This is a replacement firmware for certain models of Canon PowerShot cameras. After some web searches, it became apparent that there is really only one model camera supported by SDM that you can easily buy: The PowerShot A480, which can be had for less than $80 refurbished from the Canon Direct Store (I figure if anyone knows how to refurbish a Canon camera, it should be Canon, so I hope they will work well). I ordered a pair of black ones (to cut down on reflections) on Jan 30th, 2011 (cameras, tax, shipping: $180.17).
Camera Trigger
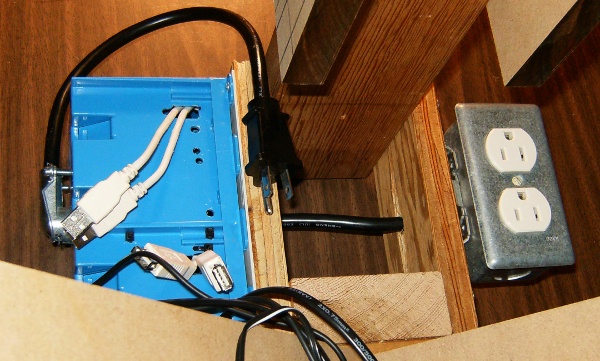
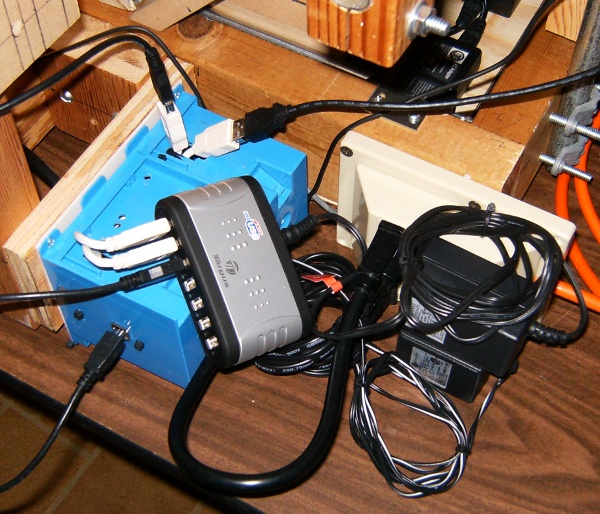
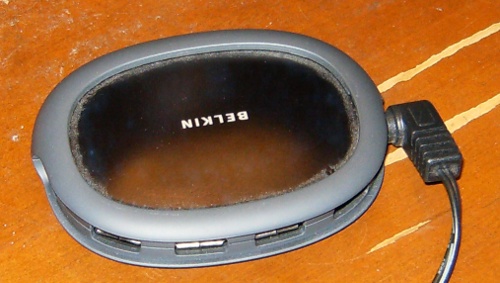
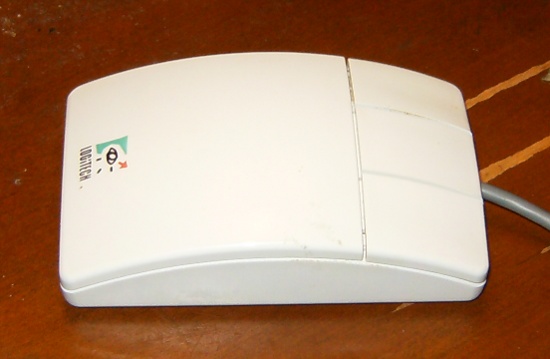
Before building any physical infrastructure, I figured I should make sure the cameras could be triggered correctly. To do this I'd need the cameras and a way to toggle the USB power on the camera's USB port (which is used as a trigger mechanism by the SDM firmware). While waiting for the cameras, I set out to work on the trigger. Using the excellent recommendation from this thread where I asked about power for the cameras and USB switch, I decided to use an old powered USB hub I had laying around. All I need is to put a switch inline on the +5V line from the wall wart that powers the hub, and stick both camera USB cables in the hub. As a switch, I used an ancient logitech mouse I had laying around (so old, in fact, it had a 9 pin DB9 serial connector on the end of the cable). I took it apart, cut the circuit board traces leading to the button switches to make sure none of the other mouse parts would interact and used the existing mouse cable to connect up all three mouse buttons in parallel for redundancy (you never know how well the buttons might work on a mouse that old - now I can use any of them to turn on the power). (Junk I had around, so additional cost for this project: $0.00.)
Once I got everything wired up, it seems like all three switches work fine. I can press any button on the mouse and the power led on the hub comes on.
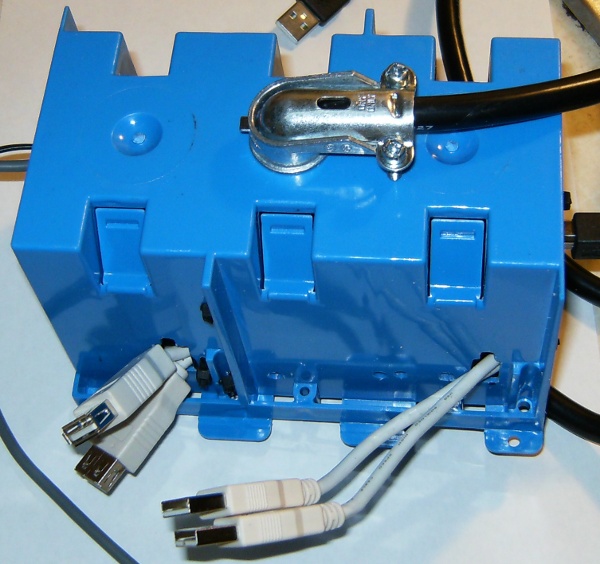
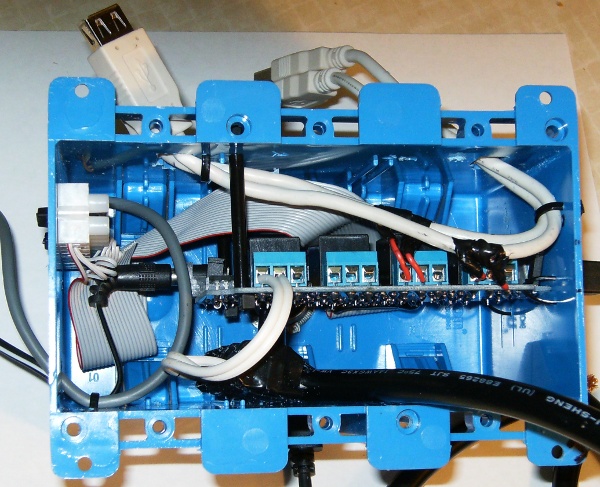
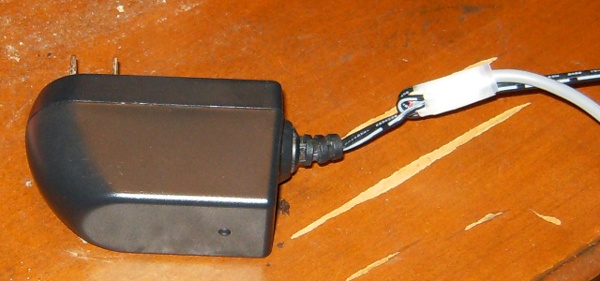
Here are some pics of the finished product, starting with the USB hub, going on to the mouse, and ending with the elegantly spliced wall wart:
Now all I need is to test with the cameras. Unfortunately, there is a hitch with the cameras - they were shipped the night of Jan 31th and the tracking information says they left the Cudahy, WI FedEx facility at 4:22 AM on Feb 1st. The same Feb 1st that paralyzed much of the USA with snow and ice. It is now the evening of Feb 4th, and no additional tracking information has appeared. I hope the truck is really still sitting in the parking lot at FedEx waiting for the ice and the backlog to clear and isn't lost in the wilderness somewhere being frozen for future generations to uncover.
Base
As far as the physical design, I don't feel the urge to do anything out of the ordinary, so I'll be doing something a lot like the standard design, but I may decide I like a hinged platen better than the sliding design from the standard build thread.
I've got some wire shelving units (kind of like this), on casters standing around with various bits of junk on them and I may decide I can clear one off and build the scanner into it, which would mean I could hang lights from the bottom of the top shelf rather than needing to build a gallows for them. It is also very convenient with these shelves to clamp things to them by screwing down wood pieces with the wire shelf between them, so posts to hold the platen and cameras might be attached to the shelf rather than the base.
On the other hand, I'm going to need clear access to the front to turn the pages and the sides to fiddle with the cameras, and the wire shelf unit might make one or more of those kind of inconvenient. I'll think about this more before I decide.
I decided I'd try to get started on the base and the book holder this weekend, so I stopped by Home Depot on the way home and got a sheet of MDF, a reasonably straight 2x4 and the drawer glides (Total: $26.69).
I do have a table saw and a drill press, so that should simplify construction and make the work go quick (except for stopping every couple of minutes to rest and dry off the sweat - no snow and ice here in Delray Beach, FL :-).
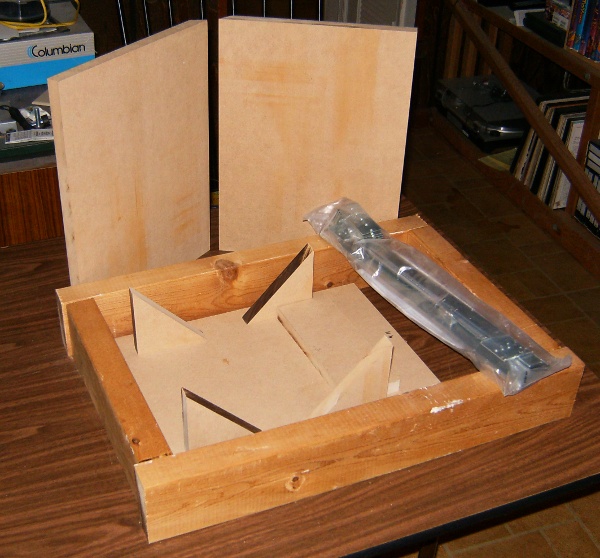
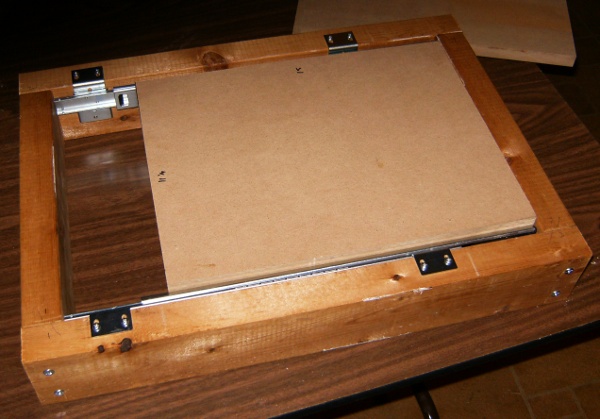
Saturday Feb 5, 2011 has arrived and I spent the morning with circular saw (to make chunks small enough to fit on table saw) and table saw to churn out all the base and platform parts, ready for drilling and assembly:
I'm laying things out on the table and marking places to drill and I noticed this post talking about bashing the brackets to mark where the machine screw sits on the side of the base. I found it simpler to just lay the parts out before attaching the machine screw and mark through the hole where the machine screw goes (less bashing involved :-).
Another burst of energy after dinner and I have the base complete, and the bottom of the platform does indeed fit in the drawer sliders (whew!).
Turns out I had to hit Home Depot again for screws long enough to hold the base together (thought I had some, but the only ones I could find were too short). Got some electrical tape while I was there to replace the Scotch tape I used on the wall wart cable previously. Total cost $9.22 and a small blister on one finger from using the screwdriver.
Platform
Sunday Feb 6, 2011 and I'm starting on platform assembly between more mundane chores like grocery shopping and laundry. Apparently there is a rule that no matter how many boxes of screws you already have, none of them will be the right size, so I've also been back to Home Depot for more screws (fortunately it is only about 1/2 mile away). Cost this time: $5.92.
Assembly is proceeding, but it is definitely tricky to come up with ways to clamp the angled pieces together when drilling the screw holes.
...I got the book supports attached to the wedges and the holes drilled for the fixed support to be attached to the base plate. Those seem to be the most complex bits, I'll have to get to the rest tomorrow. My 3x8 block needs to be shaved down a bit to allow smooth sliding (seems to be slightly wedge shaped on one side).
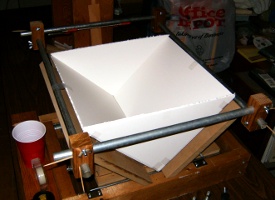
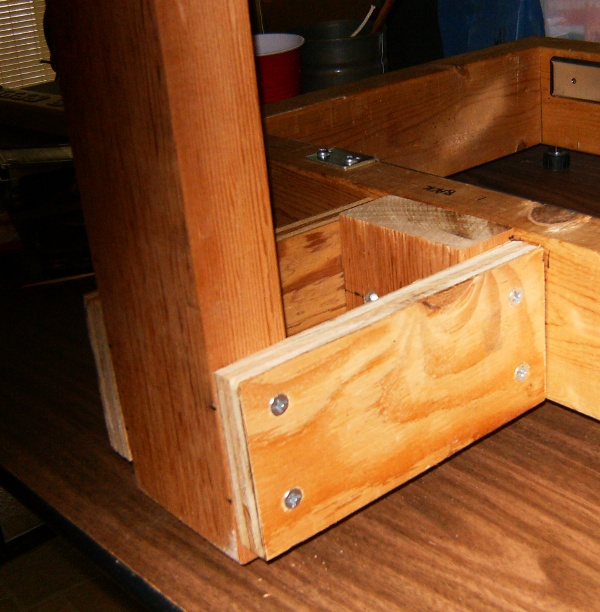
And it is now Monday morning, Feb 7th 2011 and I have completed the platform:
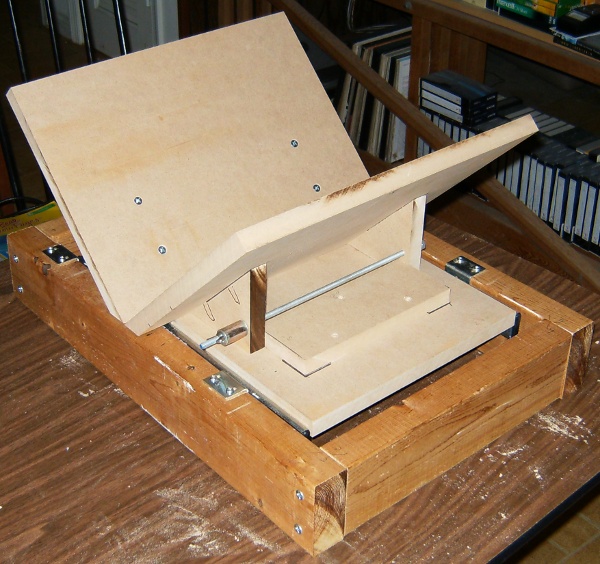
The threaded rod and wingnut and little thick metal cylinder that moves the wingnut out where I can easily get hold of it happened to be laying around in my junk pile, so no additional cost was involved. I now have what is pretty much an identical copy of the standard build base and platform. About the only difference is using 3/4 inch MDF for everything (got all the parts out of the one sheet I bought).
This much took parts of three days, with nothing like sustained effort - just fiddled with it when I felt like it. And I'm still waiting for the cameras to arrive from the frozen wastelands of Wisconsin :-).
Platen
I guess I have to think about the platen and light support now (but maybe while thinking about that I'll clean up my mess a bit before I start making a new mess).
It is now Monday evening, and I'm back playing around with scanner.
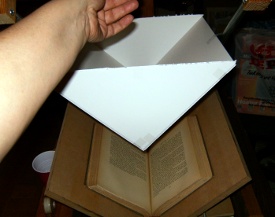
I thought about an elaborate parallelogram lift mechanism that could raise and lower a top plate where the cameras and platen could both be mounted (maybe even the lights if they were LEDs), but it would need some complicated registration mechanism to make sure it docked at the exact same position every time I lowered it, so for now it seems much simpler to just go with a simple hinge. I prototyped it in a combination of foam board, scotch tape, magazine file and knitting needle (all of which just happened to be laying around):
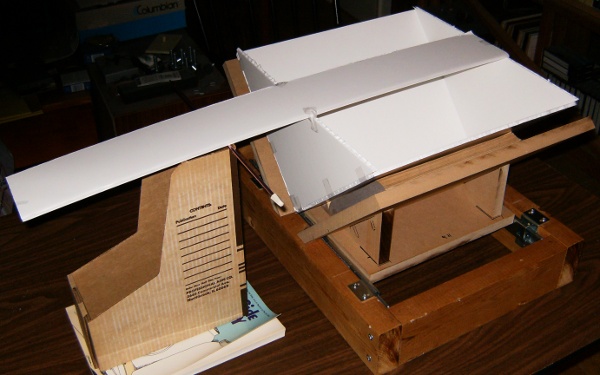
I mostly wanted to see how far back of the platen the hinge point needs to be so I have enough room to raise it and turn pages. The distance in the photo seemed to be about as close as I'd want it to be (about 5 inches).
Obviously, to accomodate different thickness books, I'll need the hinge to be on some sort of collar around the back column so I can clamp it at the right hight to be level when the platen is fully lowered. Also perhaps have a fairly loose hinge to give it some wiggle room.
Or, perhaps simpler, just have the hinge and lever be a fork like arrangement that just grabs a couple of pins on the free floating platen to raise it up, and lowers the platen so it just rests on the book when lowered. That seems kind of nifty but I can imagine it might slow you down if the platen developed a rocking motion as it was being lowered, and the fork arms would have to be kind of wide which might get in the way of the cameras.
If I want a free floating platen, maybe just cables at the 4 corners of the platen and pulleys routing the cables to a handle you pull on to raise the platen?
I think I'll just stick with the relatively simple hinge for now.
Interlude With Cameras
In other good news, I see the cameras finally show as having arrived in Orlando - they are out of the frozen north and should be here tomorrow. I was beginning to wonder if I'd finish the whole mechanism before the cameras arrived.
Tuesday morning, Feb 8th 2011 and FedEx delivered the cameras. A quick check seems to indicate they both work (at least they can take pictures). I'll have to wait till later to see about gphoto and SDM.
Checked out gphoto2 a bit, and I can download images and delete files remotely, so I won't need to physically transfer the SD cards, but there doesn't appear to be any support for fancy direct capture control by gphoto2.
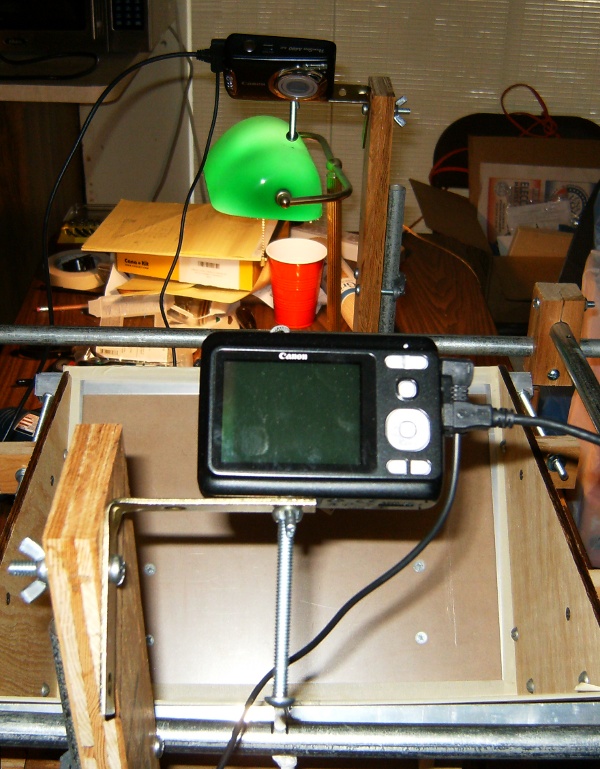
Evening now, and I have time to play with SDM. It seems to work right out of the box. Here's a couple of photos I took of me pressing the mouse button which triggered both cameras to take photos:
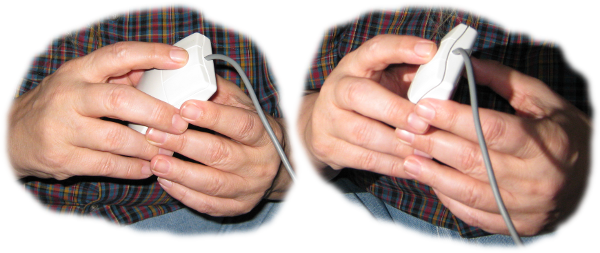
I can forget about the cameras now, and get back to putting together the rest of the scanner.
Actually, I didn't forget about them, I played around some more and determined that I can indeed automatically download the images during the scan if I get tricky enough.
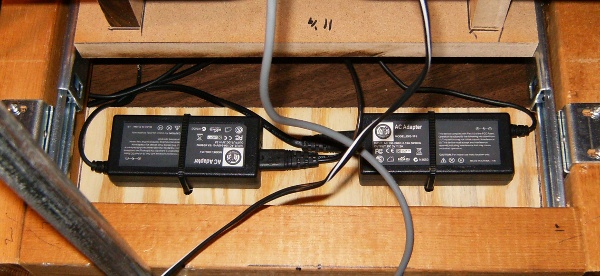
And in another brief interlude distracting me from platen building (Feb 15), the two AC power supplies I orded from amazon showed up and I tested them (seem to work fine). Total cost $19.98. I now have the batteries stored outside the cameras to avoid damage if they should develop leaks.
More Platen
Having thought for a while and looked around at the junk I happen to have, I've decided to unleash my inner tinker-toy :-). I'm going to build the lever that raises and lowers the platen out of electrical conduit and blocks of 2x2 with holes drilled through them for the conduit to fit through. The camera and light supports may get the same treatment.
OK, It is Friday Feb 11, 2011 and I've got my tinker toy platen lift mostly complete:
Not very good photos, but they show the platen (still the foam board mock up) down, then the lever arm lifted up and the platen dangling from a couple of pieces of scotch tape. The real platen should work much the same way, but probably use something more substantial than scotch tape :-).
Saturday Feb 12, 2011: I've been hooking up a permanent column to mount the lights and the hinge that the platen lift arm will swivel on, but I also have been neglecting my accounting. I've made various trips to Home Depot to pick up screws, washers, nuts, etc. and I also got some of the clamp lights and bulbs for them. Total for these previously unreported trips: $39.25. (The more I look at the clamp lamps, the less I trust the clamps. I think I'll add some chains to keep them from dropping too far when the clamp gives way.)
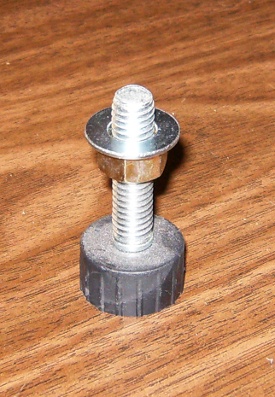
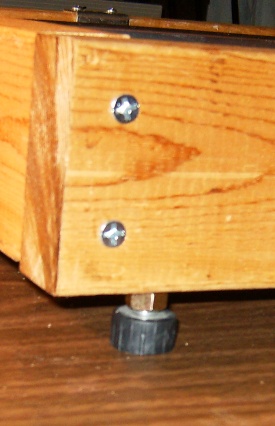
Also have some new pics from this morning's work. I had some adjustable feet laying round from when I replaced them with casters on my wire shelf units, so I drilled holes, added some nuts and washers and used them on the base to make it possible to get it nice and level with no rocking going on:
I also have the column mounted a few inches in back of the base in order to extend the lever arm a bit to make it closer to level as it drops the platen:
After a little more work, I have my hinge support. A couple of pieces of MDF with 4 dowels (glued on one side, free to slide on the other) and a nice 3/4 inch slot for the 3/4 inch conduit of the lever arm to rotate in. It can slide up and down the column and a clamp can fix it in place:
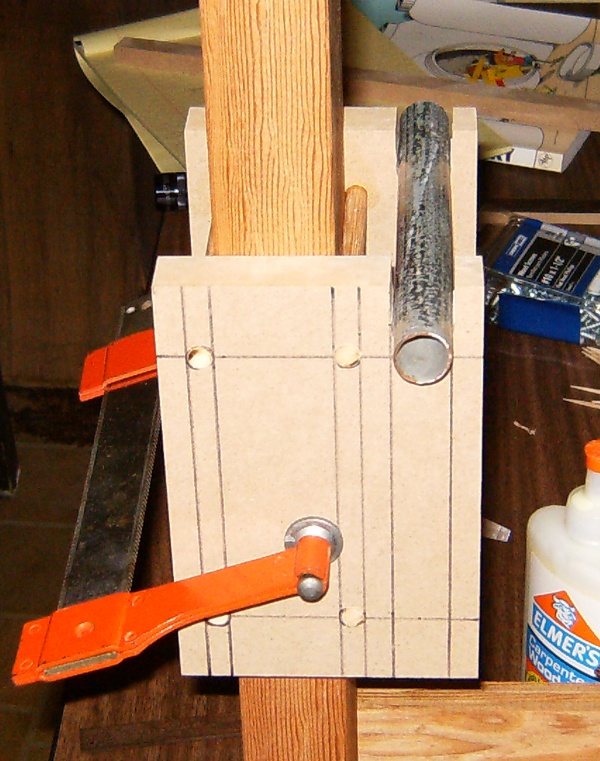
(Later I drilled another hole and added a threaded rod and wingnut to use for a clamp - a little cleaner that way.)
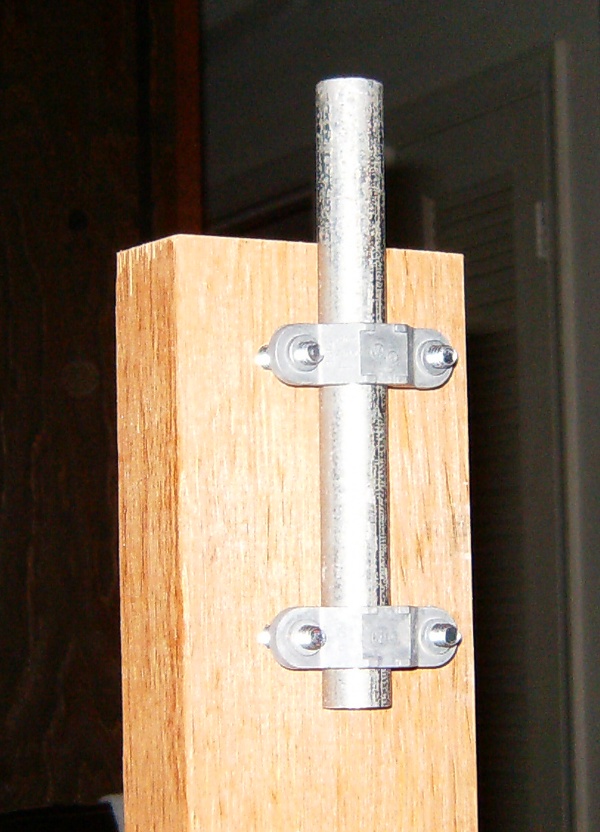
And now, I have the pipe clamps mounted which will allow me to stick a long piece of conduit (longer than the one in the picture anyway) up from the column to mount the lights:
Lights
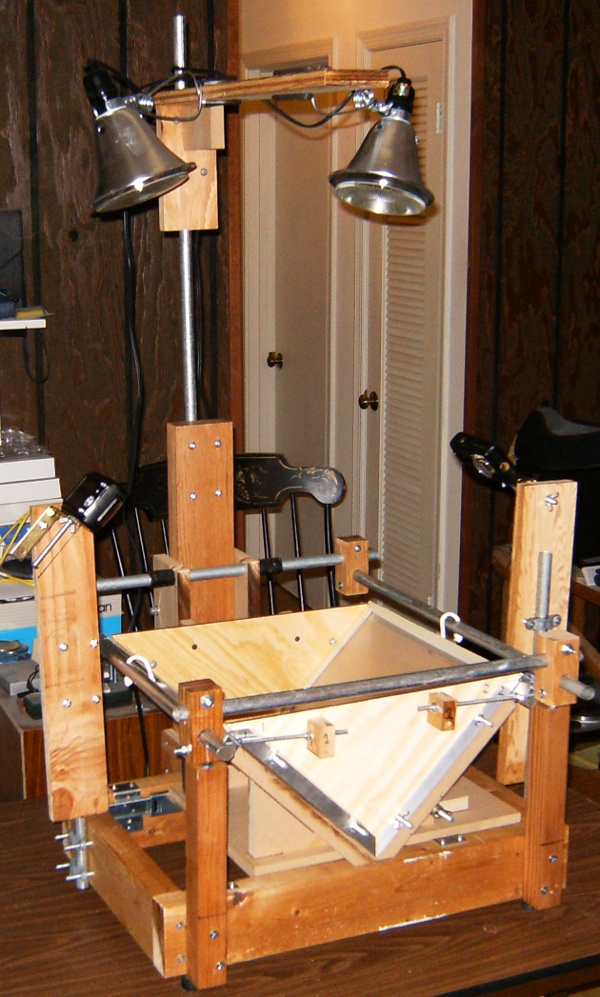
Sunday, Feb 13, 2011 and I've got a longer piece of conduit and constructed a light holder to go on the top:
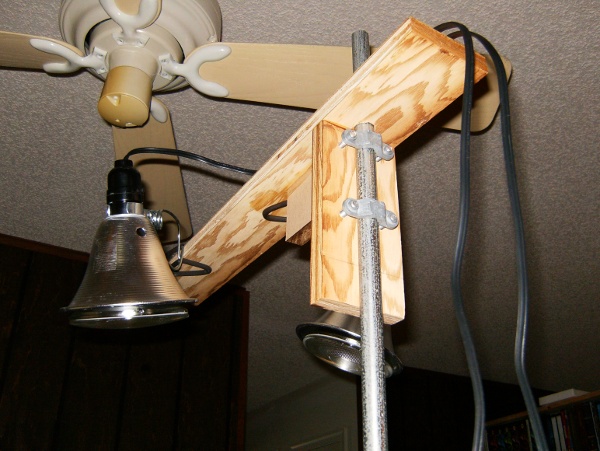
It even feels rather solid. I'm definitely liking the conduit, pipe clamp, and plywood construction (mainly because I had it all laying around).
No doubt about it, I'm going to be forced to actually work on the platen itself real soon now...
Platen For Sure This Time
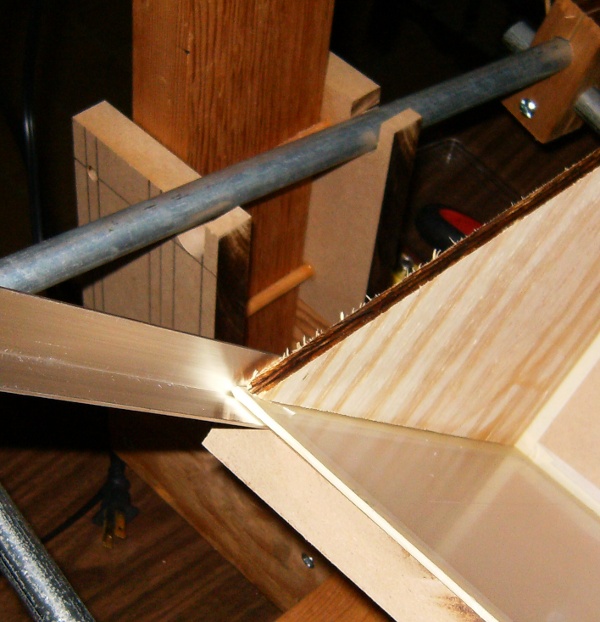
Monday Feb 14, 2011 and I've actually started working on the real platen. Back to Home Depot for a sheet of 18x24 inch acrylic, an acrylic scoring tool (worthless), a 2x2 foot sheet of nice 1/4 inch plywood and some small aluminum angle irons, and masking tape to help protect the acrylic. Total cost $33.42. I tried scoring the heck out of the acrylic to break it into two 18x12 sheets, and it worked as well as all my other experiences trying to break acrylic - the crack started deviating from the score line and I ended up with two uneven pieces. Not a big deal since I want them to be closer to 11 than 12 inches, but still a sign that I shouldn't use the scoring and snapping technique. A little searching on google found several folks who said that a router works wonders as long as you keep pushing it through as fast as the bit will cut, and since I happen to have a router, I gave it a try, and it did indeed work very well, so now I have two pieces of acrylic that just fit my book cradle.
Tomorrow, it will be time to build the framework to hold the acrylic. I figure two triangles of 1/4 inch plywood can have the aluminum angle pieces screwed to it with adjustable slots, so I can basically "clamp" the acrylic between the plywood and aluminum. This will easily allow me to substitute glass if I want to, or other things like plates with book sized holes in them for an air platen. Yes, this will leave some of the aluminum obscuring bits of the platen and sticking slightly below it, but if I have a really thin document to scan, I can just put some cardboard under it so the acrylic actually rests on the pages rather than the aluminum edge of the platen.
Tue Feb 15, 2011: No frame yet, but I did manage to cut the two plywood triangles for the ends of the platen. Maybe tomorrow, I'll get to the aluminum pieces (but they are probably going to be a pain to cut, may take a while).
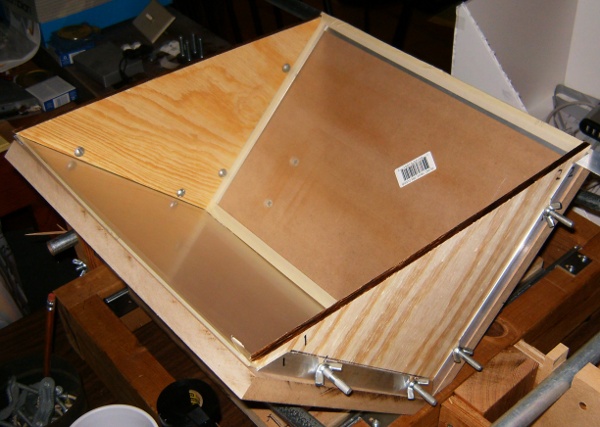
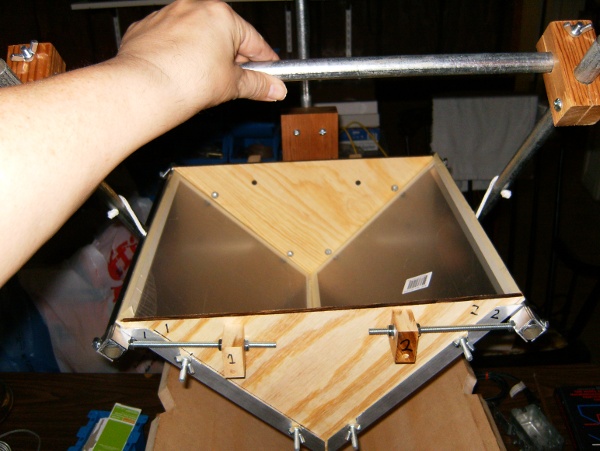
Here's the idea of how the pieces will fit together, just laid out in the proper layers with the acrylic sandwiched between the plywood and aluminum along the edge:
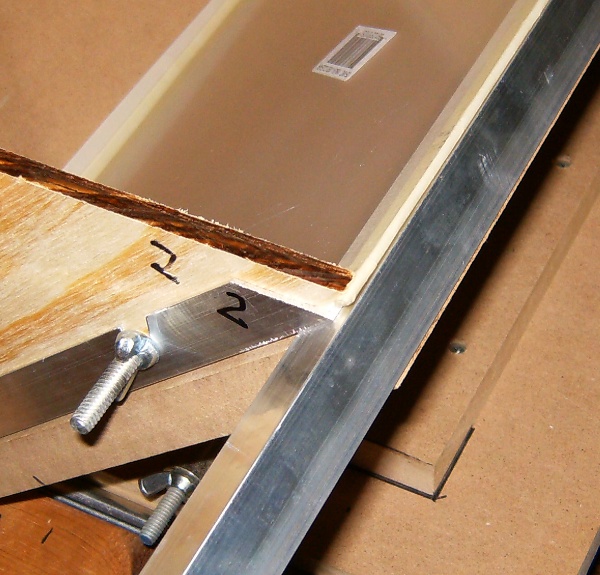
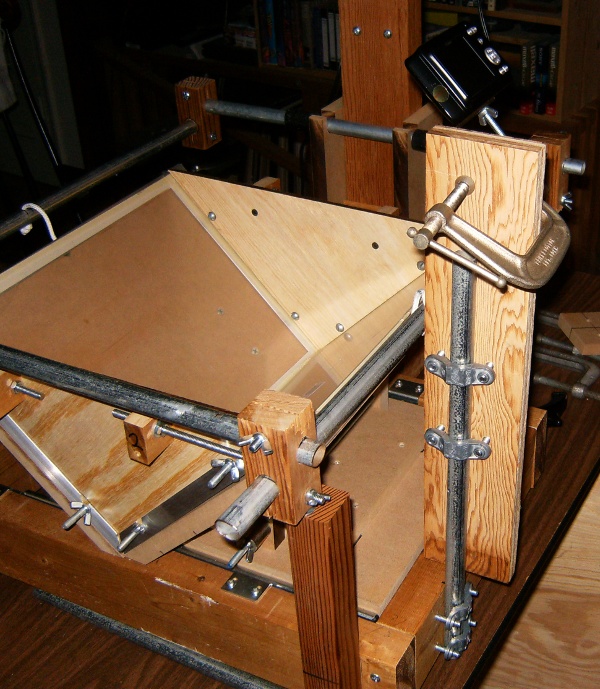
Sun Feb 20, 2011: I worked (on and off) on getting the platen assembled on Friday and Saturday, and while I'm not completely finished, I am mostly finished. The results:
Still need to come up with a good way to attach a length of angle to each side for stiffness and as a way to attach the rope or strap or whatever I wind up using to dangle the platen from the lever:
My time has been diverted somewhat by spending time working on the software.
Friday Feb 25, 2011: Getting closer to a finished product:
I've added some PVC bits from a leftover sprinkler system connector to the hinge to keep it from sliding from side to side:

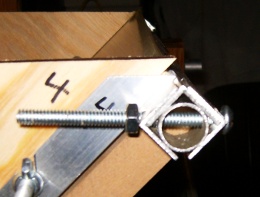
And I've worked out a (way too complex) way to mount the platen side stiffener at a 45 degree angle. Just need some longer bolts and some bits of wood added to the plywood sides to run the bolts through:

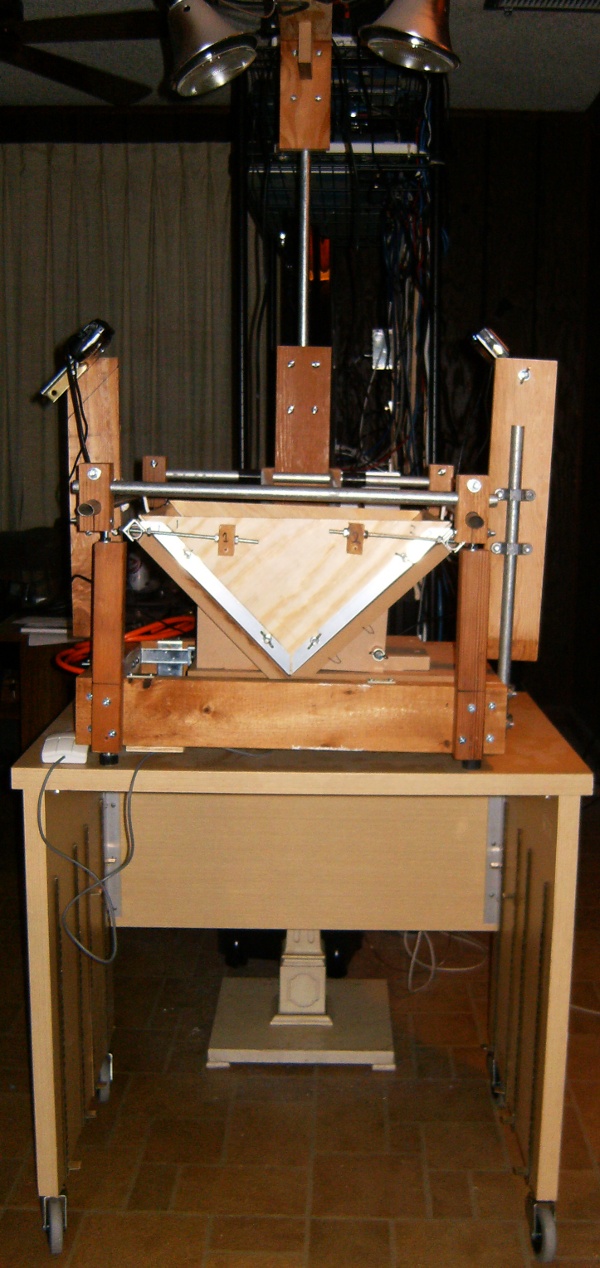
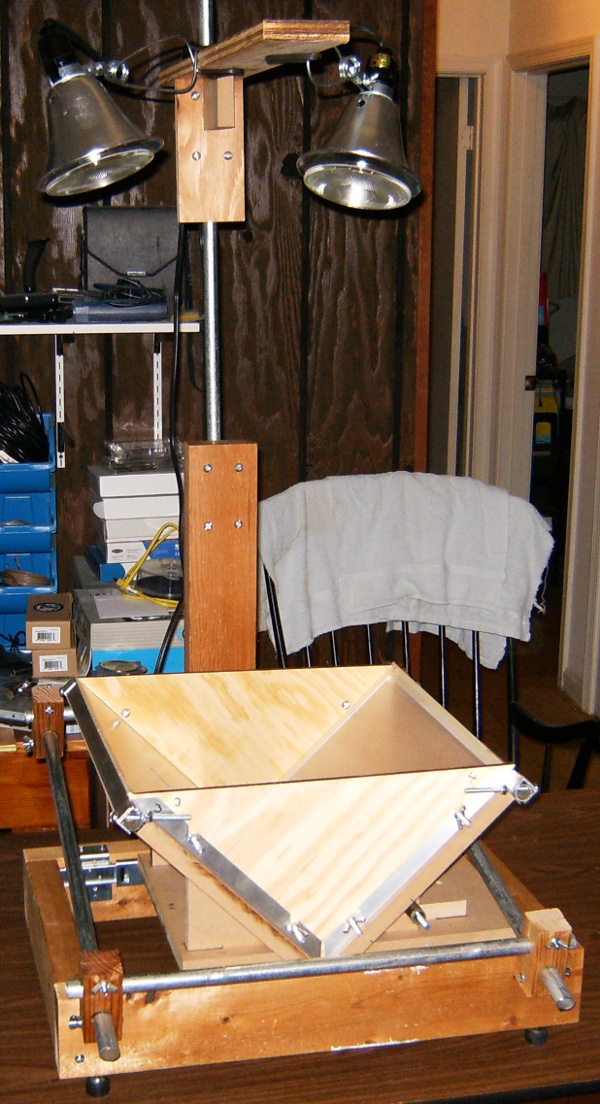
It is Friday Mar 4, 2011 and I've been making progress. I now have the platen essentially finished. It has a lever arm to pick it up where it dangles from a couple of bits of rope attached at the sides. The hinge in the back and the rest stops in the front can be adjusted in height to deal with different thickness books so when the platen is actually resting on the book, the ropes are slack and the platen conforms to the pages via gravity alone..
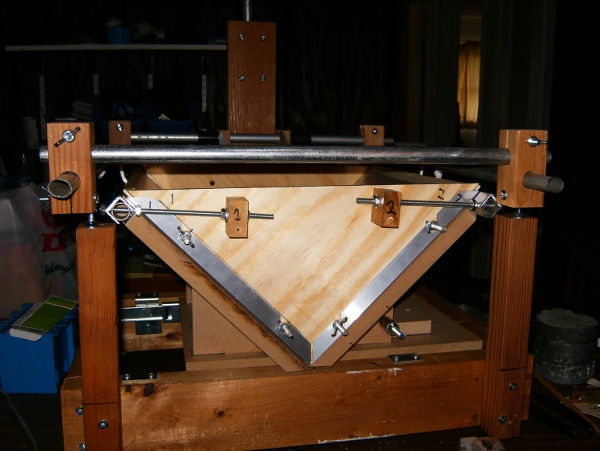
Here's the view from the front of the rig with the platen down:
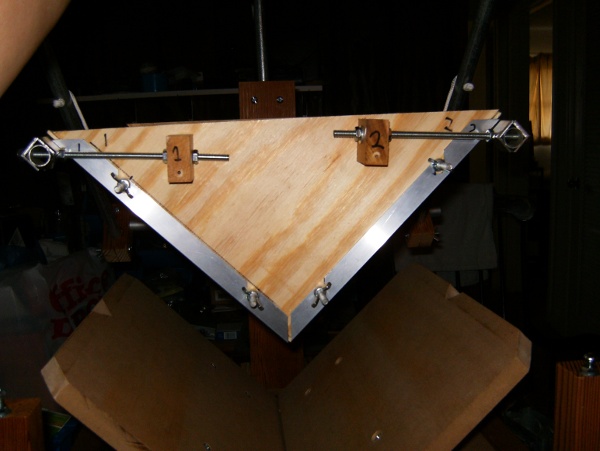
And here with the platen up:
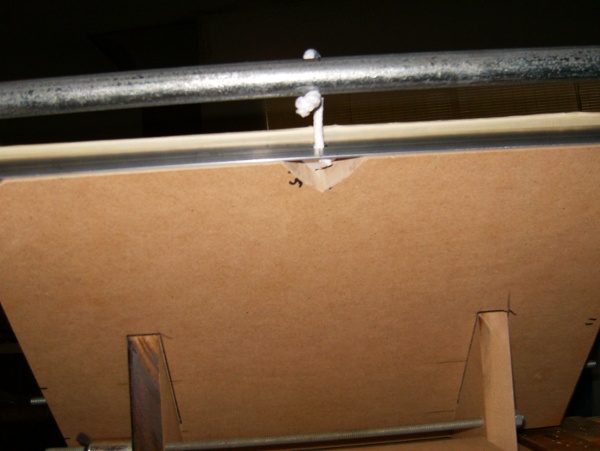
Here's the detail of the rope attachment. I've got holes in the aluminum side piece on the platen and the conduit on the lever arm with the rope threaded through the holes and knotted. A notch was cut in the book support to give space for the knot when thin books are being scanned:
And here is what it looks like from above with the platen raised:
I plan to hang a hook from the light support I can clip to the lever arm to hold it up when I need two hands, but it seems simple enough to lift it with one hand and turn the page with the other. I'll no doubt find out how well this plan will work when I try to actually scan a book...
Camera Mounts
I plan to use plywood, conduit, and pipe clamps for the camera mounts.
Saturday March 5 2011 and I've gotten a good start on one side:
I just need to drill the holes for the bracket that the camera attaches to, making sure to keep it far enough back that the lever arm will clear it.
Sunday March 6, 2011 and I'm finished with most of the physical bits (though I'm sure there will be some drilling and screwing left to get it all wired up):
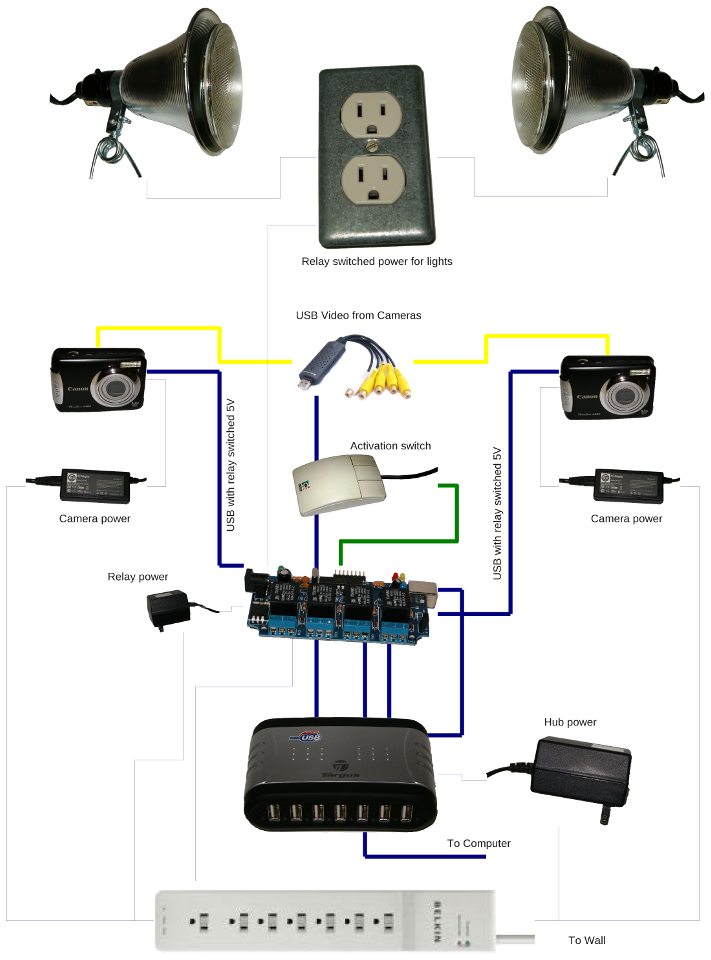
Wiring
After the camera mounts are in place, I'll need to get everything wired up. This may be the biggest challenge of all :-). I've made this handy chart that I think shows everything involved: