Matter and Form 3D Scanner
- Day One with Elephant
- Fix Annoying Car Keys
- Hide The LEDs
- Interlude with Windows 8.1
- Scan Station
- Glitch or normal variance?
- Rock Scanning
- Samsung Galaxy Camera
- Custom Grip
Day One with Elephant
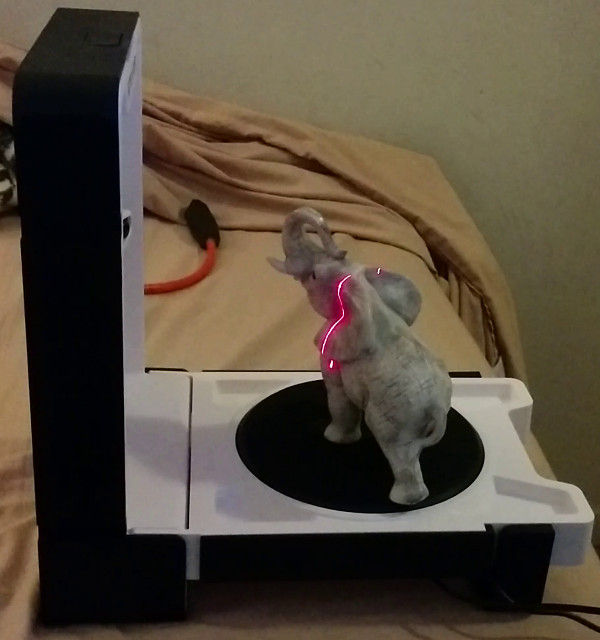
My latest toy is a Matter and Form 3D Scanner. Here you see a laser firing at an elephant in my first scan:
My goal was to use this on my Fedora Linux box along with my Solidoodle 3D printer, but matterfom decided not to produce linux software, so here you see it on my bed hooked to the Windows 7 media PC in my bedroom :-(.
The first thing I tried was using USB passthrough to run it from a Windows 7 virtual machine on my Fedora box, but that also didn't work for some as yet unknown reason. The Arduino pass through worked fine, but no trace of the Logitech webcam showed up in my first attempt, thus the resort to the media PC.
Anyway, the scan eventually finished, but it took something over 3 hours (maybe even 4 - the software doesn't seem to record the scan times, so I'm not sure when it finished):
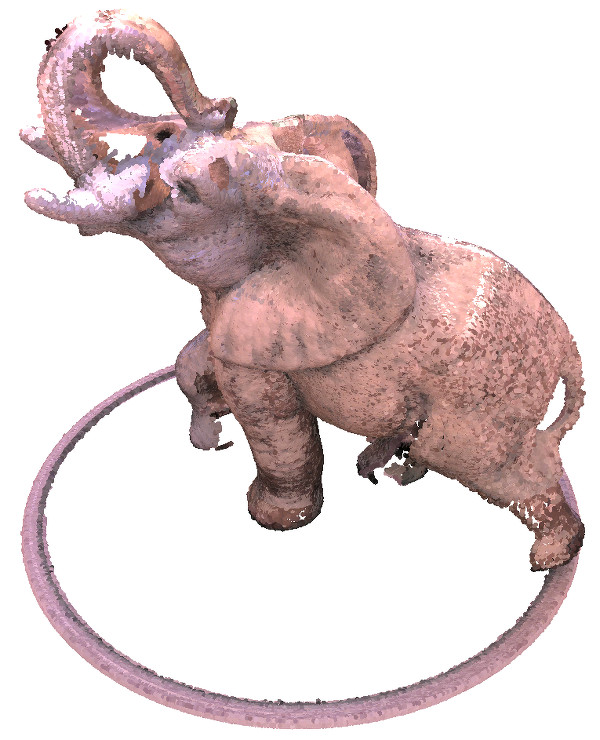
The videos on the matterandform help pages talk a lot about challenges scanning certain kinds of objects. Certainly this elephant has a deep fold in the side and fairly deep detail in the tusks and mouth, and the nose and tail are looped around. Some parts were just never visible to both the camera and the lasers at the same time. If I really wanted a complete scan of this elephant, I'd have to scan it again with different placements on the turntable, then combine the scans.
Here's a photo from about the same angle:
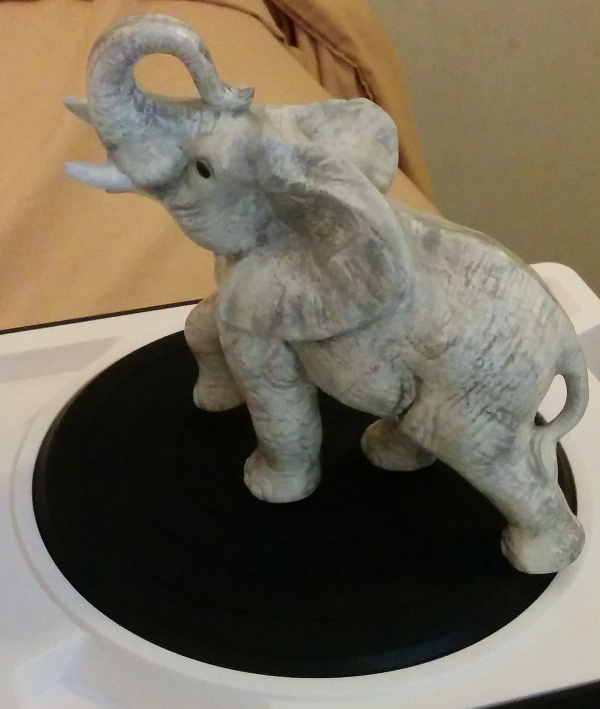
No actual holes in the real object, and the color is not very good either. The scan is almost red, but the real object is shades of gray.
Overall, I'd say I'm pleased with this as a very first scan of a very large complicated object. The really bad color might be the only thing to object to (if I actually cared about color scans :-).
The matterandform videos do warn about all the issues I see with this elephant, and give techniques for fixing the problems, so it definitely worked up to snuff right out of the box.
I tried the elephant just to throw something tough at it. Next, I'll be trying to scan some things I want to derive 3D printable models from.
Fix Annoying Car Keys
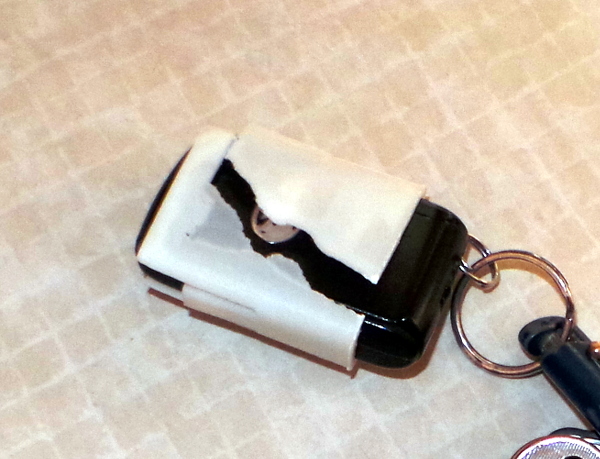
First up is my Toyota keyfob which constantly locks, unlocks, or sets off the car alarm just because it is in my pocket when I bend over or sit down near the car :-). I want to build a sheath for it, so I'll want the inside dimensions of the printed object to be quite tight. I'll find out how accurate the dimensions I get actually are... It is also a much smaller object, so I'll see what I discover about scanning smaller things (but first, I may need to get some Play Doh or something to stick it upright on the bed).
I have indeed gotten some Play Doh, and it does seem to work to hold small things like my keyfob at a convenient angle on the scanner bed:
I've also managed to dig up a rusty old folding table I can put near the media PC so I don't have to use my bed as a perch for the scanner. Now I'll see how well I can scan the keyfob (which I've dusted with baby power since it is fairly shiny - especially the chrome Toyota logo).
Note: I decided I ought to re-calibrate before trying to get the best scan, and when I removed the keyfob, I discovered that the Play Doh sticks in the grooves in the turntable, so perhaps it ought to go on a disk of cardboard rather than directly on the turntable :-).
After calibration, I did a "medium" scan of the keyfob, resulting in this rather wild looking raw scan:
I promise I didn't actually fire an RPG through the center :-).
Anyway, I used the cleanup tool to make that look a lot better, with auto clean getting rid of the explosion of dots in the center, then I exported it in STL format, reducing the Poisson parameters a bit to try and smooth the result. That gave me a quite nice STL file, but it wasn't remotely oriented the way I want to derive a 3D print from it, so I fiddled with the STL some in meshlab and netfabb to get it rotated to the vertical orientation I'll want when making a sheath from it. That resulted in something that looks like this:
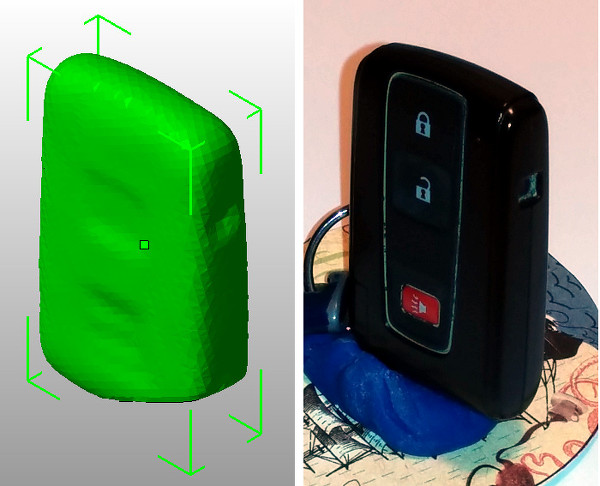
It seems to compare rather nicely with the original, and if I compare some measurements pulled out of meshlab with some measurements of the original using a micrometer, they seem pretty close (especially considering that I can't really be sure I measured the exact same spots).
Now if I can import this into openscad, I can scale it up a little bit and subtract the original from the scaled object to give me a shell, then add some protective bubbles or something over the dadgum buttons that are always getting pressed and maybe if I get really ambitious arrange for some sort of springy clip to lock down into the holes on the side when I push it on, and I'll have derived my first 3D printed part from a scan (that's the plan, anyway).
Seems to have worked. Openscad didn't give me any trouble with imports, and I've turned out this gadget:
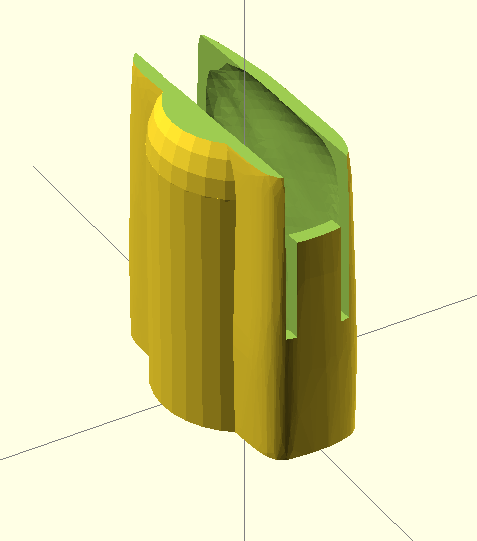
I've uploaded what I have so far to thing 447026 on thingiverse. Hopefully I'll be able to update it when I make a successful print :-).
Well, it did print mostly OK, but there is this big thin patch on the back with some of the filament not solidly joined. I've heard the claim that this is a layer change effect, but I notice that if I print multiple copies of something at once, only one of them screws up like this even though both obviously go through a layer change:
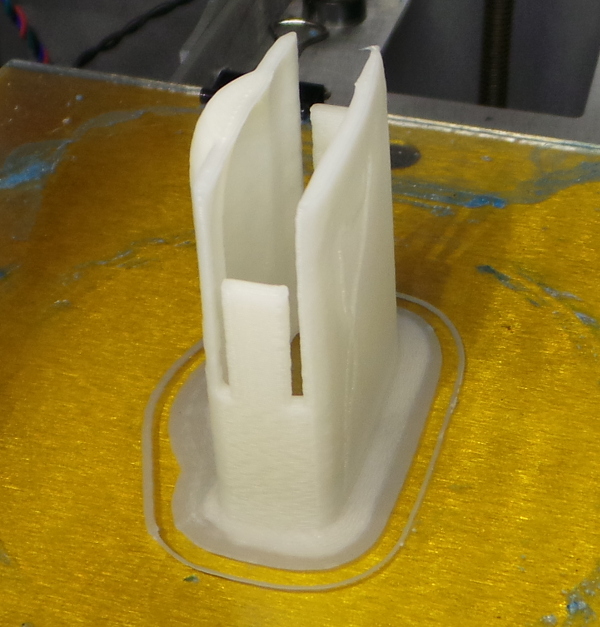
Aside from that, it was too small. No doubt the printer can't match the dimensions perfectly, so I'll have to scale the whole thing up a bit for the next print to give it a bit of slack to fit the keyfob. If I print two at once, maybe one will print without the problem area running up the back:
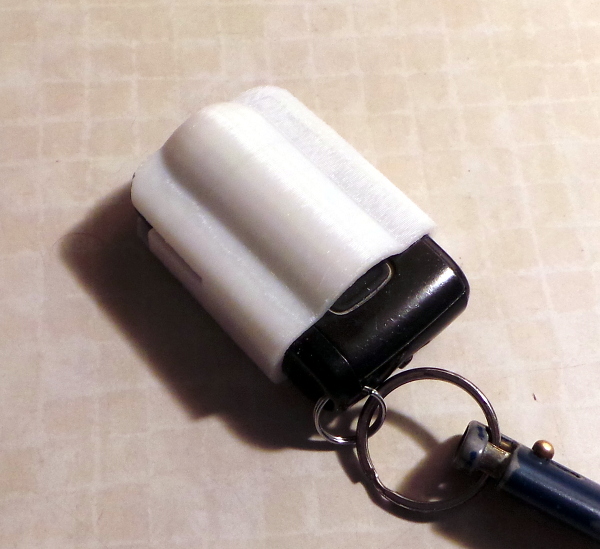
I shifted the outer shell ever so slightly to try and make the back thicker, but clearly I'm simply not scaling up the outer shell enough, the thin spots moved to the front :-). On the success side, the scale of the entire object did seem to do the trick to make the inside big enough - I can fully insert the keyfob now:
However, the very shallow buttons on the inside don't really click into the holes in the keyfob very positively, so I need to enhance those buttons, and the top edges of the sheath don't do anything but stick out into space where they could probably poke me in the leg, so I should round them off as well. Perhaps the third time will be the charm...
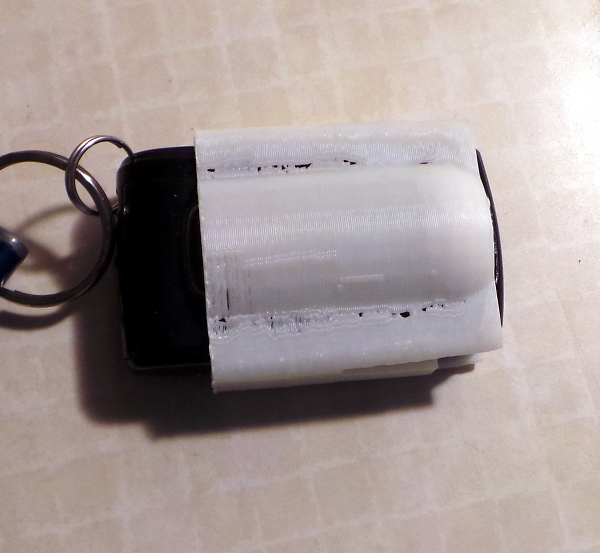
Third time was the charm! I've now finished this (and updated the thingiverse files). The thicker shell prints much better, and the springy arms actually click into place (but tugging on it a little bit still allows me to pull it off in the rare case when I need the buttons). I think this will work nicely, but time will tell...
Hide The LEDs
A new project I just started on: Scanning various objects in my bedroom which have annoying bright LEDs and building 3D printable objects to hide the LEDs by hook or by crook. I'm starting with the single most annoying LED in the universe: The insanely bright green LED on the wireless charger for my Nexus 7 tablet. If not blocked it generates a bright enough green light to illuminate the whole wall in my bedroom and cast shadows. I have been using this quick and dirty clip on Qi Charger Shield, but it constantly falls off. Now I've used the scan to make the MkII Qi Charger Shield. Unlike the keyfob, I didn't use the scan directly in the openscad model, instead I simply used it to pick off dimensions, locations, and angles, then build the openscad model from scratch. There are lots more annoying LEDs where that came from, so there is still work to do...
Interlude with Windows 8.1
Redhat bug 1135488 provided the information I needed to get the webcam to work in a virtual machine, but that just led to the next problem: The Fedora libvirt system doesn't provide any 3D accelerated graphics for Windows virtual machines, and the scanner software needs to use opengl to do 3D. That pretty much put the nail in the coffin for using a virtual machine.
Since I can't run this in a virtual machine, I got the cheapest Windows box I could find to serve as a dedicated system to run the scanner: an ASUS VivoPC running 64bit Windows 8.1.
It works well, the software runs fine and had no problem recognizing the scanner and doing a sample scan of the next brightly lit gadget I want to put a lid on, however, getting through the Windows 8.1 initial setup screens took years off my life. I have to have a Microsoft account to login? I have to opt into 47,651 offensive marketing ploys? I have to activate cloud storage? I have to submit blood samples?
My God! All I wanted to do was turn it on and load the scanner software. I didn't expect a kind of Spanish Inquisition! It is a testament to my self control that I didn't hurl the box through a window before I made it through setup (though I did scream a lot).
Naturally, to top off a perfect evening, Comcast internet went down for several hours just as I was almost finished, and I spent another wonderful interlude trying to get the box to connect to my phone's hotspot (the first and most obvious thing I tried didn't work until I got back to it a few hours later and the exact same thing worked perfectly). I have no proof that connecting a Windows 8.1 box to the internet caused the Comcast outage, but I do have my suspicions...
Fortunately both I and the VivoPC lived through it all, and google told me how to turn off the Microsoft account login connection, the annoying Metro interface, and most of the "report everything to Microsoft" crap. I also found how to enable auto login, and add startup programs, so from now on, this machine should boot and immediately start running the scanner software, and I'll never actually notice Windows 8.1 again (sheesh!).
P.S. I also want to apologize to both Gnome 3 and Ubuntu Unity. They are not the worst user interfaces in the universe. The Microsoft Metro interface is far more annoying than either of them.
Scan Station
Here's the scanning station I have now setup on an old printer stand:
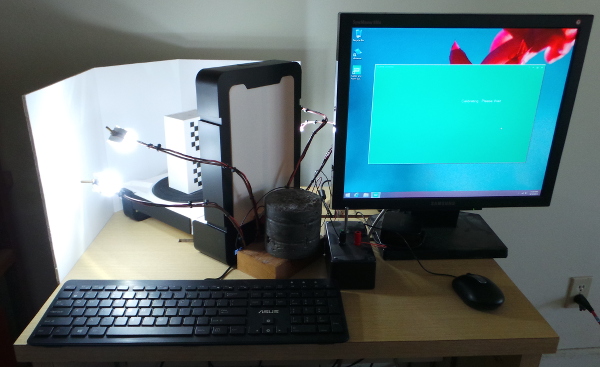
I have some LED lights on a controller I can use to adjust the brightness, and some handy foam board on the corner to reflect the lights around the object being scanned and block any outside motion from the scanner view.
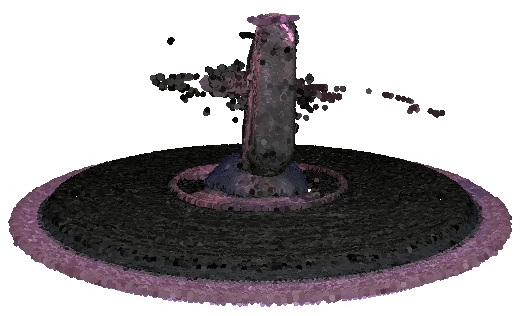
Glitch or normal variance?
Now that I have the scan station setup, I can see the laser lines hitting the foamboard in back of the scanner, and I'm wondering if I'm seeing a possible problem, or just some minor variation in the two different lasers:
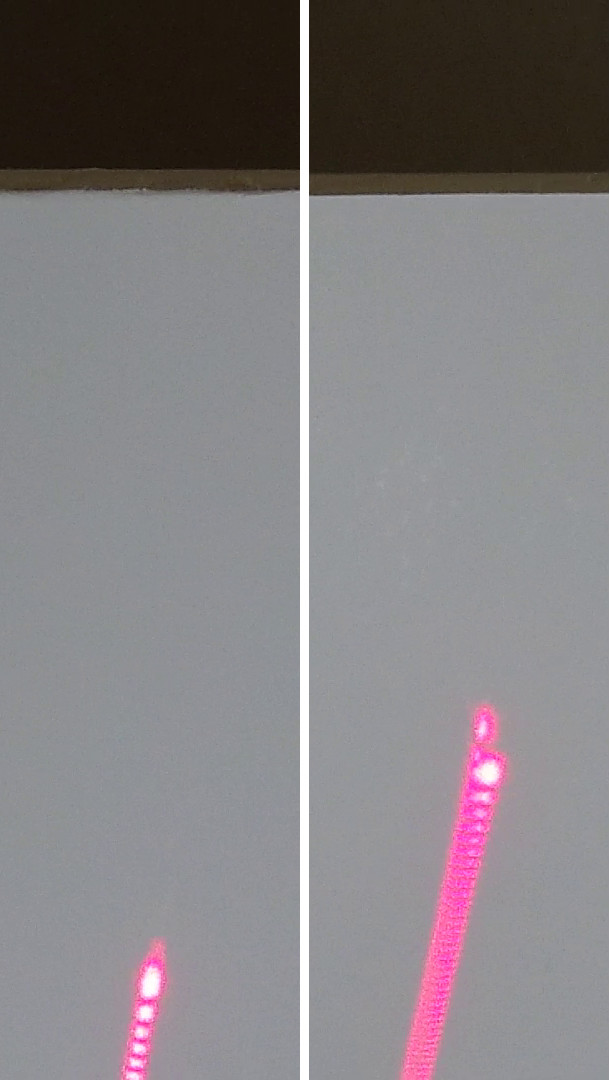
I recorded some video and cut out the above images. To my eye, it looks almost like the laser line on the right is actually two lines, though it isn't as obvious in the image. The laser on the right also extends much higher than the laser on the left.
Perhaps this doesn't really matter. I can't detect anything like this variation in the lines that actually hit the object being scanned (which is much closer to the scan head), but I just thought I'd record the observation.
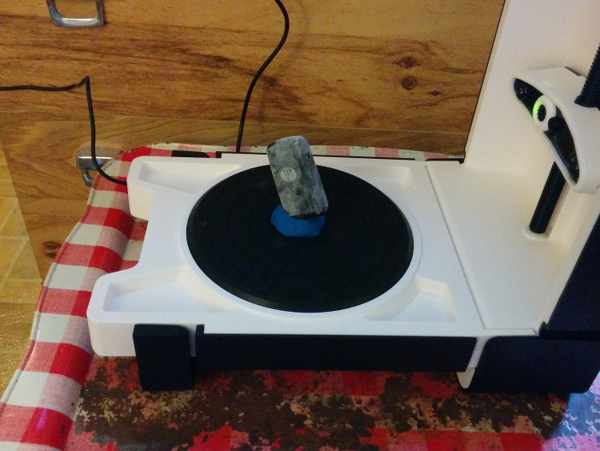
In another more obvious glitch, two images of a rock I was scanning cause the combine code to crash. I've reported that bug.