Desktop Fan
The files for this are on printables at Silent and portable desk fan

A fairly elaborate project to build a mostly silent and portable desk fan out of ridiculous expensive components:
- Noctua NF-A12x25 PWM, Premium Quiet Fan
- Noctua NA-FC1, 4-Pin PWM Fan Controller
- Talentcell Rechargeable Lithium ion Battery Pack
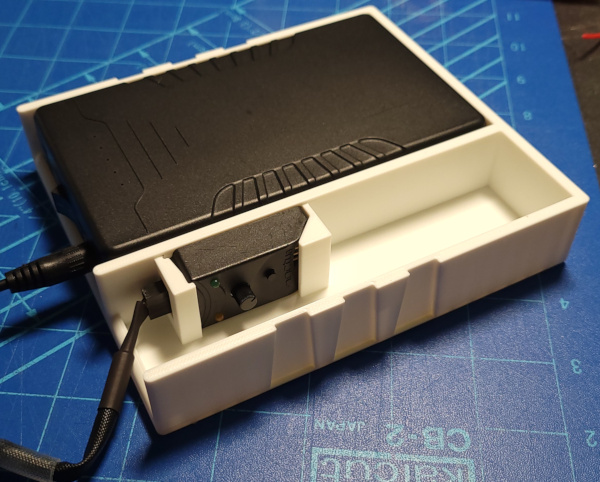
After much fiddling with scans and measurements of the PWM controller, I managed to make a pocket in the base that is a nice push fit for the controller, plus the fan cables go through holes in the side, making absolutely positive it is secured in place. In addition the battery pack is nice and heavy to hold everything down:

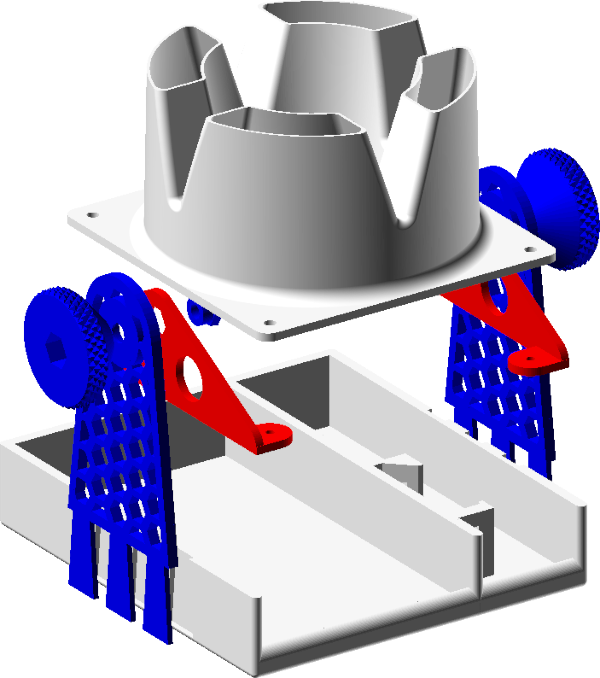
There are lots of 3D printed parts, here's an exploded view of where they all go:

| axlejig.scad | Optional jig to help glue the fanaxle parts to the fanside parts. Use a bolt run through the jig, then through the fanside, then screwed into the fanaxle then pull the bolt up to seat the fanaxle squarely in the fanside (after applying glue) so the threaded rod will be at 90 degrees. If you put a nut near the top of the bolt, you can then screw it down to apply pressure without having to pull on the bolt till the glue dries. |
| box.scad | This is the base of the fan where the battery and fan controller go. The fantower parts are glued into the dovetail slots in the side. |
| fanaxle.scad | You should drill out the hole with a 13/64th inch drill, then tap the hole with a 1/4-20 tap. The fanaxle is glued into the matching hex shape in the fanside. The axlejig can be used to pull the axle solidly into the hex hole so it is perfectly square. Once that glue is dry, you then need to glue about a 1 inch long piece of 1/4-20 threaded rod into the axle, as deep as it can be threaded, but not sticking out the other side. The knob will screw onto these threads. |
| fanside.scad | These pieces go on either side of the fan, and have tabs sticking out at either end where M3 bolts will fit through the shroud, the fan, and the fanside to bolt them all together. Washers and locknuts are probably best. You probably want to put a fan screen under the fan as well to keep your fingers out. |
| fantower.scad | These are the towers that hold the fan up so it can rotate. They are glued to the box and the threaded rod runs through them where the knob can be used to lock the fan at any angle. |
| knob.scad | The knobs have a hex hole on the outside where a 1/4-20 nut can be glued. When tightened down on the threaded rod, they lock the fan in place. |
That is all the OpenSCAD I wrote for this project, but there are other bits needed as well.
fan.stl is an edited version of Noctua NH-AAS from thingiverse. I removed the mount sticking out one side since I didn't want to mount it that way.
knurledFinishLib_v2_1.scad is from Knurled Finish OpenSCAD library v2.1 and is used to knurl the knobs.
You'll also need to Frankenstein some kind of cable to join the 12V barrel connector output from the battery pack to the 4 pin fan connector on the PWM controller. I made the cable in the photo at the top by cutting one of the Noctua accessory cables and a barrel connector cable I was willing to sacrifice and soldering them together. No doubt a better cable would use a right angle barrel connector and crimp real male fan connector pins on the end. For reference: With the PWM controller shoved into the box, the top pin is ground, the one just below it is 12V and the other two pins are not used.