Andy Scan
Introduction
Andy Scan is an android program currently being designed to run on the new android powered cameras to be used for scanning books (nothing would prevent it from being used with phones as well as long as the phone camera is good enough to use as a scanner). This is the user manual for the (partially) vaporware version currently under construction [Some of it is working, like taking pictures on screen touch and uploading them to web server].
Scanning a book consists of taking a picture of a pair of pages, turning the page, taking a picture of the next pair, etc. This goes on till you have imaged every page in the book. (or if you prefer, it might mean taking a picture of one page at a time, or two pages at once with two cameras, depending on your workflow and scanning setup)
Andy Scan's job is to make it simple to take each picture with the minimum of effort, so a lot of work is devoted to different kinds of trigger mechanisms. It can also use Wi-Fi to get the pictures off the phone and on to a more powerful host system for postprocessing.
When you launch the Andy Scan app, you will get a full screen landscape mode camera preview image, which currently has some gibberish displayed in the top left corner (this will probably become something more useful like interactive instructions someday).
Option Menu
Activating the android option menu will give you something like this:
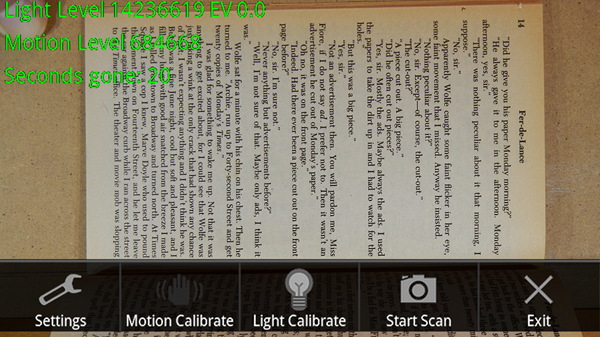
Settings
Selecting the Settings option from there will bring up this screen where you can scroll through all the settings:
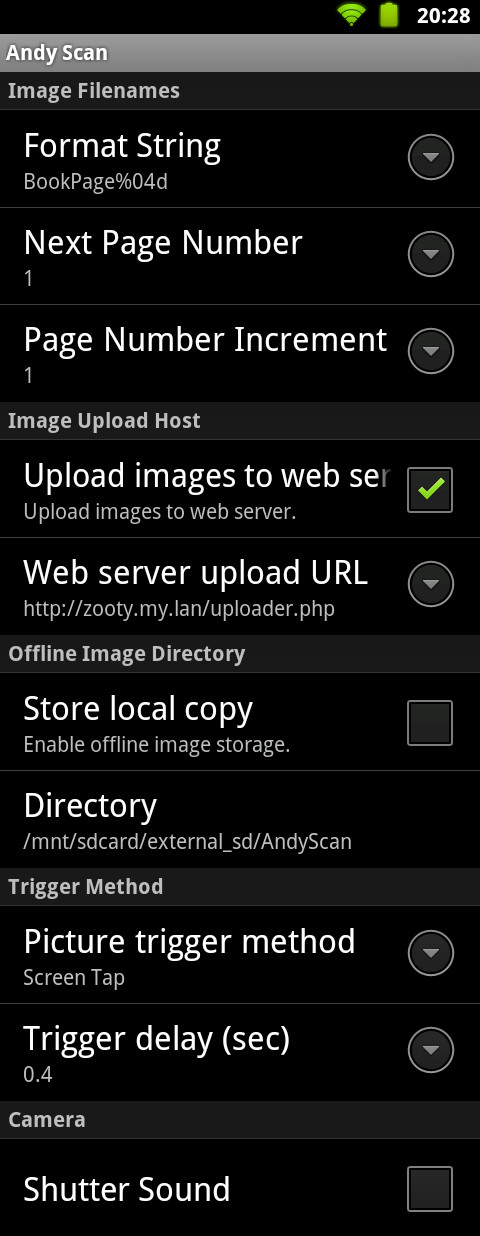
The Image Filenames settings are used to construct the file names to be assigned to each image as you scan the pages in the book. The Format String should have a number format in it somewhere where the page number is placed. The Next Page Number is automatically updated as the scan process proceeds, and each new page number is computed by adding the Page Number Increment to the last page number. This allows the flexibility to do something like scan the odd pages one way counting up, then flip the book around and scan the even pages counting down, etc.
The Image Upload Host settings are used to tell Andy Scan where to upload each image file. The upload is done using the same sort of POST uploader (most trivially a php script) as described in the Up With php documentation.
The Offline Image Directory can be used to simply save the images on an sdcard. Normally when online, the images are not saved on the camera, so the size of the collection is not limited by the sdcard, but you can enable this option to save copies locally, or operate without connection to a remote host. If you disable both online and offline storage, you can still scan, but you will be doing a dry run. No images will be saved.
Note: The code expects to be able to invoke the OI File Manager to set the directory name, so you will need to have it installed (or some other file browser tool that works the same way).
Triggers
The trigger method setting brings up a new submenu to select among supported methods [only screen touch is supported at the moment]:
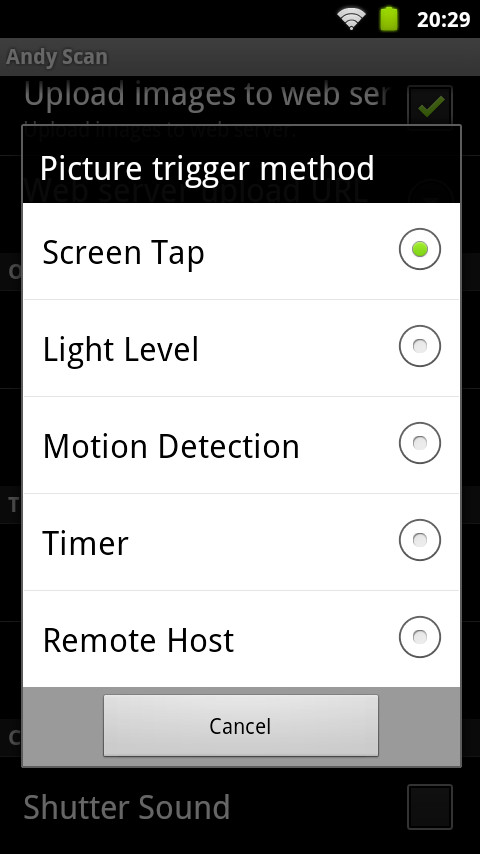
Screen Tap is the traditional way to take a picture. In this case, the Trigger Delay can be used to give any vibrations caused by tapping the screen a chance to die down before it actually take the picture.
Light Level attempts to determine how bright the field of view is, and triggers the picture when you turn up the lights. The Trigger Delay time gives any auto exposure hardware a chance to react to the new light level. Before using this trigger, you should use the Light Calibrate option menu item to determine the trigger values to use for taking pictures in your light conditions.
Motion Detection compares consecutive preview images to see how similar they are and triggers the camera when it sees motion (you turning the page) followed by no motion (you getting your hands out of the field of view after finishing the page turning). In this case, the Trigger Delay time serves as a watchdog timer. That many seconds with no motion needs to elapse before the picture is taken. If it sees motion during that time, it starts the delay count from zero again. Before using this trigger, you should use the Motion Calibrate option menu item to determine the best trigger values.
Timer is dead simple. It just takes a picture at regular time intervals. If you work out how long it typically takes to turn a page, this might be the simplest trigger to use.
The Remote Host trigger expects the (vaporware) remote host software to trigger the picture by sending a command to the phone (this might be good for using your computer mouse button as a handy trigger it relays to the phone, or perhaps someday an elaborate page turning robot will be run by the remote host (not today :-). The Trigger delay is also applied here, but for this technique you might want to set the delay to zero.
For all these the Trigger delay value is given in seconds. Fractional values are allowed.
Motion Calibrate
Selecting the Motion Calibrate option will put the camera into a mode where you can gather data on the numbers the camera sees in the preview when you are turning the page and not turning the page. [Someday, anyway, but not yet.] The idea is that it should be possible to find a good low number that indicates no motion (small differences between preview images) and a good high number that indicates motion (large differences between preview images). The details of how this might operate are not yet determined (but I'm sure something is possible).
Light Calibrate
Like Motion Calibrate, the Light Calibrate option will allow you to gather the data needed for the camera to decide when the lights are on. [Also not yet implemented.] I've already seen this will be tricky with my phone (which I am using for testing) since the camera won't report the exposure value. For my phone, I'll have to notice the brightness of the preview hitting a peak, then sliding back down as the camera adjusts the exposure. No details worked out here yet either.
Start Scan
Once you have selected a trigger technique (and done any calibration that might require), you can get your book ready and select the Start Scan option. The camera will give you a countdown, then proceed to start taking pictures based on the trigger technique you selected. [Actually, at the moment, it comes up already in scan mode and tapping the screen will take and upload a picture.]
Download
If you want to play with this, but don't want to build from source, a random version of the binary can be downloaded from AndyScan-debug.apk (this is just whatever I happened to build last prior to updating this web page, so you never know what you'll get :-).
Links
You can look at the mythical android book I am writing to record my android learning experiences. (Chapter 6 is about this program and has links to the source code).
You can read about the sort of android cameras I expect to use with this program (if they ever ship).
You can read the DIY Book Scanner Forum which is how I got interested in all this. I started this thread to talk about Andy Scan.
Or you could look at all the other nonsense I'm up to at my home page.
Future
This is a plenty big enough chunk of work to do for now, but I could certainly imagine adding features like simple cropping and rotation of the images. No doubt other nifty features will come to mind after I get more of it working and see what can be improved.