My new computer came with Windows 7. Windows 7 is much more user friendly than Windows Vista. I don't like that.

Installing a Windows 7 KVM with virt-manager wasn't too difficult, but I thought I ought to record my procedures in case I need to do it again. (This was hosted on a Fedora 20 system, but virt-manager is much the same on any host).
Get needed ISO files
First I created windows7.iso by using k3b to copy the DVD I purchased (yes, it is a legal copy!) to an iso image file. (Lots of ways to do this, I happened to be familiar with the k3b tools menu).
Next I downloaded virtio-win-0.1-74.iso. That was the latest version when I installed. Newer ones are likely to appear in the future. You probably want to check the download directory for newer iso files:
http://alt.fedoraproject.org/pub/alt/virtio-win/latest/images/
Disk image
In the directory I have configured for my virtual images, I ran the command:
qemu-img create -f qcow2 windows7.img 50G
That created a qcow2 format disk image that will look like a 50GB disk to Windows7, but be stored in the much more compact qcow2 format on my host (about 13GB when fully installed and configured). Lots of different disk formats are available, but I like to keep my image sizes down for easier backup. You can create this directly in virt-manager, but I find the interface there more confusing than just doing it manually.
Configure KVM
Then I cranked up virt-manager and pressed the button to create a new virtual machine. I told it I was installing Windows 7. I pointed the CD to the windows7.iso file, and the disk to the windows7.img file. I checked the Customize before install option so I could fiddle with the virtual machine definition before trying to install.
In the KVM configuration, I set the Disk bus to VirtIO, I set the Performance options Cache mode to writeback. I set the display type to Spice server. I set the Video Model to QXL. I made sure an EvTouch USB Graphics Tablet was defined for use as an absolute pointing device. In the networking setup, I had to use advanced mode to set it to use my bridge device rather than the default tap device. I also set the network device model to virtio. Most everything else came up with good defaults for Windows.
I tried to add a 2nd CDROM drive to point to the virtio iso image, but in the preinstall state, I kept getting python errors about variable 'disk' not defined. So I let it start the install, killed it, then tried to edit the virtual machine once it was fully defined. At this point, I could add a 2nd CDROM. Just to be paranoid, I moved the windows7.iso image to the 2nd CD, and put the virtio-win-0.1-74.iso on the 1st CD, but set the boot order to boot from the 2nd CD (I've had other versions of windows in the past refuse to look for drivers anywhere but the 1st CD :-).
Another thing I tried was setting the CPU topology to look like a multi-core processor (which is what I have), but it turns out that the i7-4770K in my host is only 1/2 a Haswell. Some of the features qemu wants for the topology emulation don't exist, so I had to settle for a single processor Windows7 Home installation.
Install Windows7
This configuration did indeed boot OK, and when the Windows installer said there were no disks, I was able to browse to the WIN7\AMD64 directory on the 1st CD and select the redhat virtio driver (VIOSTOR) for the disk (I'm installing 64 bit Windows7). This enabled the install to proceed directly on to the virtio disk, which I'm sure ran much faster than a fake IDE disk would run.
When selecting the driver, I always told windows not to search, I'll select the driver, no really I don't want to search, yes I have a disk, no really, I'll select the driver, etc. After much convincing, I can finally drill down to find the driver I know I want. Perhaps this is paranoid, but I've had many experiences of Windows blue screens after I let it search, then had it work perfectly when I pointed directly at the one I wanted, so I tend to never let it search.
Tweak drivers
Later, I was also able to get the network to function by pointing at the redhat virtio network driver and configure the more obscure ballon and virtio serial drivers from the same WIN7\AMD64 directory on the CD:
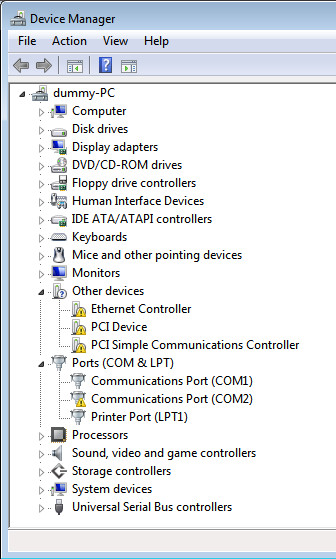
Right click the items with the yellow error icon in the device manager and pick the update driver option. For Ethernet Controller use the NETKVM driver. For PCI Device use the BALLOON driver. For PCI Simple Communications Controller use the VIOSER driver. (COM2 just isn't connected to anything, so it will always show an error as near as I can tell).
That gets Windows7 installed, but feeble. The next thing to do is grab spice-guest-tools-0.74.exe from the downloads on http://www.spice-space.org/. (Again, a newer version will be worth searching for in the future).
You run that installer inside the Windows7 virtual machine, and it installs the QXL video driver and various other bits (like the spice agent which allows cut & paste to work across the KVM and host machines). Once these guest tools are installed, you can get good quality video and sound from the virtual machine using virt-viewer or virt-manager, and you can make the screen higher resolution.
Somewhere in there I also got rid of the 2nd CD drive and disconnected the iso image I no longer needed (also setting the boot order to start from hard disk).
I also successfully activated Windows7 at this time, so that seemed like a good place to stop and make a copy of the KVM definition (via virsh dumpxml) and the virtual machine disk image. If it all goes wahoonie-shaped someday, I'll be able to get back to square one and start again.
Updates
Since Windows7 has been around for a while, it is now time to install updates for many hours, find that new updates are available to update the updates you just installed, and repeat the process again and again. I lost track, but I think I went through about 7 rounds of this.
Second Drive
A good way to help keep the main system disk image clean is to install a 2nd virtual drive, and move swap space, temp directories, and the internet cache to the 2nd drive.
I created a 12G raw format disk image (raw images have better performance than qcow2 and that is probably a good thing for swap area and cache files). I attached it to the virtual machine as a new virtio disk. I then booted Windows again and finally found the deeply hidden storage management app with many google searches and pixel hunts in the control panel. I scrolled down to the new disk, initialized it, formatted it as NTFS, and labeled it TEMP.
After many more searches, I finally found the advanced performance app in the computer properties and was able to turn on the swap space on the new TEMP drive and turn swap off on C:. Somewhere in the same vicinity, I found the environment settings and pointed TMP and TEMP to a new Temp directory I created on the TEMP disk (I did this both for the system and my user). I also went into Internet Explorer and found the cache directory setting and moved it to the TEMP disk.
Optimize Disk Image
Having gotten as much junk off C: as possible, I started trying to clean it up. In disk properties, I ran the cleanup disk tool to clean temp files and wot-not. I then ran it again and clicked the cleanup system files button to cleanup all the zillion restore points created while doing all the rounds of updates. Finally I ran the defrag tool to consolidate files and leave larger chunks of free space.
This leaves the qcow2 disk image kind of ragged around the edges. Mine was almost 25G, but Windows showed only about 13G of used space once I did all the cleaning.
Now you can do a nifty trick to reduce the size of the qcow2 image: Download the SDelete tool (if it has moved, just search for Windows 7 sdelete and the right link will probably be at the top of the list) inside the Windows 7 KVM, install it somewhere convenient, and in a administrator command window run:
sdelete -z
That will take a while (depending on the size disk you defined, on my system it took 10 or 15 minutes), and will fill all free space on the disk with zeroes. This will also expand the qcow2 disk image to the max possible size. Once that finishes, shutdown the Windows7 machine.
In the directory where you have the disk image stored, you can now run:
qemu-img convert -f qcow2 -O qcow2 windows7.img windows7-base.img
That will convert the qcow2 image for the virtual machine (window7.img) to a new qcow2 image (windows7-base.img). Because it is smart enough to not use space for blocks of all zeroes, the windows7-base.img file winds up much smaller (it should be about the 13G that Windows was reporting inside the virtual machine for the used space on C:).
At this point, you have two choices: You can rename the files, saving windows7.img as old-windows7.img (in case something goes wrong) and moving windows7-base.img to windows7.img. This is the simplest and you sould be able to boot the KVM again and have it run as well as it was before, but with a much more compact disk image file.
A trickier gimmick you can use is to still save the old image, but then do this:
chmod 444 windows7-base.img
qemu-img create -f qcow2 -o backing_file=windows7-base.img windows7.img
That creates a really tiny (to start with) windows7.img file that is "backed" by the windows7-base.img file. When you run the virtual machine with this image, all changes to the disk go into the windows7.img file and the windows7-base.img file retains all the original content. So any time you want to get back to the original system (to eradicate a stubborn virus perhaps), you can simply remove windows7.img and re-run the create command above to make a new clean image that will start from the base again.
The qcow2 images also support internal snapshots, but if you do that, you have to backup the whole image file again when it has changed. I like the separate backing_file to avoid that.
Once you are sure all is well, you can get rid of the huge old-windows7.img file.
At this point, everything is optimized and working. You can certainly do another round of optimizing the disk in the future when things get old and crufty again, but you are all set for now.